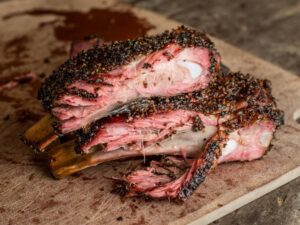
Smoked St. Louis Ribs are a revelation with their tender, smoky meat, savory dry rub, and delicious hint of sweetness from the rich St. Louis BBQ sauce.
You really can’t go wrong with St. Louis Ribs, especially when they’re smoked to perfection. They’re one of my favorite types of ribs to make, especially on the smoker, because they’re meaty and easy to eat.

Why You’ll Love It
- Tender, fall-off-the-bone texture: These ribs achieve a melt-in-your-mouth tenderness that’s simply irresistible.
- Easy preparation: It’s a straightforward preparation process and minimal hands-on cook time.
- Goes with everything!: These ribs pair wonderfully with a variety of sides, from classics like coleslaw and corn on the cob to smoked macaroni and cheese.
What are St. Louis Ribs?
This cut is taken from the belly side of the pig, near where the spare ribs are found. St. Louis ribs are a trimmed-down version of spare ribs, with the rib tips, cartilage, and sternum bone removed to create a rectangular-shaped rack.
They are generally larger and flatter than baby back ribs, with more meat between the bones and a higher fat content, which contributes to their flavor.
The additional fat in St. Louis ribs results in a richer flavor. They are often favored in barbecue competitions and are known for their ability to hold up well with sauces and rubs.

Ingredients You’ll Need
- St. Louis-style pork ribs – You can smoke as many racks of ribs as you like or that can fit on your smoker.
- Yellow Mustard – I really prefer the sharpness of yellow mustard here, but you can also use Dijon.
- Pork dry rub seasoning – You can make your own pork dry rub with our recipe, or you can use a store-bought dry rub.
- Apple juice – Don’t use a sugar-free juice.
- Apple cider vinegar – This mixes well with the flavors of the apple juice, but you can use another type of vinegar if you need to.
- BBQ sauce – Use your favorite BBQ sauce or make this homemade St. Louis BBQ sauce.
Equipment Needed
- Smoker – We use a Traeger Grills Pro 575 for most of our smoking, though I also have a Z Grills 700 series. Whenever we’re smoking something small, we use our Ninja Woodfire Outdoor Grill.
- Wood pellets – There are many types of pellets available. We like Traeger Signature blend or Bear Mountain Gourmet Blend. If you’ve already got pellets in your smoker, use whatever you have.
- Meat thermometer – Many smokers have a thermometer built in, but if yours doesn’t, get an instant-read thermometer. I love this Thermapen.

Helpful Tips
- Be sure to remove the membrane from the bone side of the ribs. This allows better absorption of flavors and seasoning into the meat and it makes the ribs easier to eat.
- After applying the yellow mustard and dry rub, let the ribs sit for at least 30 minutes or overnight in the refrigerator if time permits. This allows the flavors to penetrate the meat deeply.
- You don’t have to wrap the ribs, but we think it leads to juicier, more tender meat. It’s up to you – give it a try and see how you like it best.

Smoked St. Louis Ribs
Ingredients
- 2 racks racks of St. Louis-style pork ribs
- 1/4 cup (62 g) yellow mustard
- 1/4 cup (18 g) pork dry rub seasoning
- 1/3 cup (83 g) apple juice
- 1/3 cup (80 g) apple cider vinegar
- 1/3 cup (95 g) BBQ sauce
Instructions
- Preheat your pellet grill to 250°F (107°C). Fill the hopper with your preferred pellets.
- Removing the membrane from the bone side of the racks.
- Coat both sides of the ribs with a thin layer of yellow mustard.
- Generously season both sides of the ribs with the dry rub, ensuring an even coating. Let sit for 15-30 minutes.
- Mix the apple juice and vinegar together in a clean spray bottle.
- Place the ribs on the pellet grill, bone side down. Close the lid and smoke for 3 hours. In the last hour, spray the ribs 2-3 times (about 8 sprays each) with the apple mixture.
- After 3 hours, carefully remove the ribs from the grill. Cut two large pieces of aluminum foil (large enough to fold over the ribs to form a packet).
- Mix any remaining spray with the BBQ sauce in a bowl. Pour half the sauce onto each piece of foil. Place a rib rack, meat side down in the liquid to coat the top, then turn it over so it’s bone side down again.
- Tightly wrap the ribs in the foil.
- Return the foiled ribs to the grill and continue cooking for an additional 2 hours.
- Carefully remove the foil packets from the smoker and let rest for 30 minutes before opening.
Notes
- Be sure to remove the membrane from the bone side of the ribs. This allows better absorption of flavors and seasoning into the meat and it makes the ribs easier to eat.
- After applying the yellow mustard and dry rub, let the ribs sit for at least 30 minutes or overnight in the refrigerator if time permits. This allows the flavors to penetrate the meat deeply.
- You don’t have to wrap the ribs, but we think it leads to juicier, more tender meat. It’s up to you – give it a try and see how you like it best.
Nutrition
How to Store & Reheat
If you have leftovers, allow the ribs to cool down to room temperature. Wrap them tightly in aluminum foil or place them in an airtight container. These ribs can be stored in the refrigerator for up to 3-4 days or in the freezer for up to 2-3 months.
Reheating
Oven: Preheat your oven to around 250°F. Place the ribs on a baking sheet, cover with foil to prevent drying out, and reheat for approximately 20-30 minutes or until they reach the desired temperature. For frozen ribs, allow extra time, up to 45-60 minutes.
Grill: Preheat your grill to medium heat. Place the ribs on the grill and cover with foil or use a grill-safe pan to prevent direct heat. Heat for about 10-15 minutes, turning occasionally, until warmed through.
Before reheating, consider brushing the ribs with a thin layer of BBQ sauce to help retain moisture and add extra flavor during the reheating process
Like this recipe? We’d love for you to share it on your Pinterest board! Click to follow our Pinterest boards so you can find all our recipes!
Instagram it! If you try this recipe please tag #legendsofthegrill on Instagram or Twitter. We love to see your photos of our recipes! Also follow us on Facebook to keep up on what we’re cooking up.